
Dependency injection in Symfony
You work with Symfony, but the concept of dependency injection is a little blurry for you? Find out how to take advantage of the component reading this article.

In order to ensure that your application is running well, it's important to write functional tests.
Behat is the most used tool with Symfony to handle your functional tests and that's great because it's really a complete suite.
You should nevertheless know how to use it wisely in order to cover useful and complete test cases and that's the goal of this blog post.
When we are talking about functional testing we often mean that we want to automatize human-testing scenarios over the application.
However, it is important to write the following test types to cover the functional scope:
Interface tests: Goal here is to realize interface verifications to ensure that our web application features can be used over a browser,Integration tests: Goal of these tests is to ensure that sour code (already unit-tested) which makes the application running is acting as it should when all components are linked together.Idea is to develop and run both integration tests and interface tests with Behat.
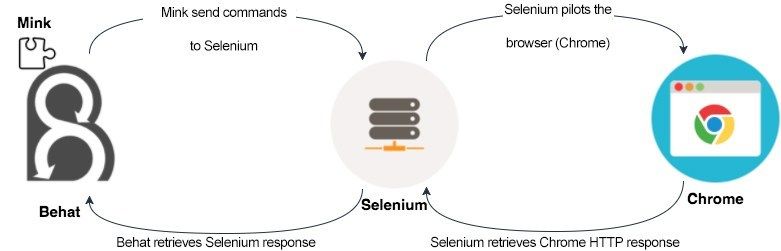
Before we can go, please note that we will use a Selenium server which will receive orders by Mink (a Behat extension) and will pilot our browser (Chrome in our configuration).
To be clear on the architecture we will use, here is a scheme that will resume the role of all elements:
First step is to install Behat and its extensions as dependencies in our composer.json file:
"require-dev": {
    "behat/behat": "~3.1",
    "behat/symfony2-extension": "~2.1",
    "behat/mink": "~1.7",
    "behat/mink-extension": "~2.2",
    "behat/mink-selenium2-driver": "~1.3",
    "emuse/behat-html-formatter": "dev-master"
}
In order to make your future contexts autoloaded, you also have to add this little PSR-4 section:
"autoload-dev": {
    "psr-4": {
      "Acme\Tests\Behat\Context\": "features/context/"
    }
}
Now, let's create our behat.yml file in our project root directory in order to define our tests execution.
Here is the configuration file we will start with:
default:
    suites: ~
    extensions:
        Behat\Symfony2Extension: ~
        Behat\MinkExtension:
            base_url: "http://acme.tld/"
            selenium2:
                browser: chrome
                wd_host: 'http://selenium-host:4444/wd/hub'
            default_session: selenium2
        emuse\BehatHTMLFormatter\BehatHTMLFormatterExtension:
            name: html
            renderer: Twig,Behat2
            file_name: index
            print_args: true
            print_outp: true
            loop_break: true
    formatters:
        pretty: ~
        html:
            output_path: %paths.base%/web/reports/behat
We will talk of all of these sections in their defined order so let's start with the suites section which is empty at this time but we will implement it later when we will have some contexts to add into it.
Then, we load some Behat extensions:
Behat\Symfony2Extension will allow us to inject Symfony services into our contexts (useful for integrations tests mostly),Behat\MinkExtension will allow us to pilot Selenium (drive itself the Chrome browser) so we fill in all the necessary information like the hostname, the Selenium server port number and the base URL we will use for testing,emuse\BehatHTMLFormatter\BehatHTMLFormatterExtension will generate a HTML report during tests execution (which is great to show to our customer for instance).Finally, in the formatters section we keep the pretty formatter in order to keep an output in our terminal and the HTML reports will be generated at the same time in the web/reports/behat directory in order to make them available over HTTP (it should not be a problem as you should not execute functional tests in production, be careful to restrict access in this case).
Now that Behat is ready and configured we will prepare our functional tests that we will split into two distinct Behat suites: integration and interface.
In our example, we will write tests in order to ensure that a new user can register over a registration page.
We will have to start by writing our tests scenarios (in a .feature file) that we will put into a features/ directory located at the project root directory.
So for instance, we will have the following scenario:
File: features/registration/register.feature:
Feature: Register
  In order to create an account
  As a user
  I want to be able to register on the application

Scenario: I register when I fill my username and password only
  Given I am on the registration page
    And I register with username "johndoe" and password "azerty123"
  When I submit the form
  Then I should see the registration confirmation</pre>
As said previously, these tests are here to ensure all code written for the registration page can be executed and linked without any errors.
To do so, we will create a new integration context that concerns the registration part under directory features/context/registration:
File: features/context/registration/IntegrationRegisterContext:
<?php

namespace Acme\Tests\Behat\Context\Registration;

use Acme\AppBundle\Entity\User;
use Acme\AppBundle\Registration\Registerer;
use Behat\Behat\Context\Context;

/**
 * Integration register context.
 */
class IntegrationRegisterContext implements Context
{
    /**
     * Registerer
     */
    protected $registerer;

    /**
     * User
     */
    protected $user;

    /**
     * boolean
     */
    protected $response;

    /**
     * Constructor.
     *
     * @param Registerer $registerer
     */
    public function __construct(Registerer $registerer)
    {
        $this->registerer = $registerer;
    }

    /**
     * @Given I am on the registration page
     */
    public function iAmOnTheRegistrationPage()
    {
        $this->user = new User();
    }

    /**
     * @Given /I register with username "(?P<username>[^"]*)" and password "(?P<password>[^"]*)"/
     */
    public function iRegisterWithUsernameAndPassword($username, $password)
    {
        $this->user->setUsername($username);
        $this->user->setPassword($password);
    }

    /**
     * @When I submit the form
     */
    public function iSubmitTheForm()
    {
        $this->response = $this->registerer->register($this->user);
    }

    /**
     * @Then I should see the registration confirmation message
     */
    public function iShouldSeeTheRegistrationConfirmation()
    {
        if (!$this->response) {
            throw new \RuntimeException('User is not registered.');
        }
    }
}
Integration test for this part is now done for our feature. Let's write the interface test now!
This test will be based on the same feature file without modifying the original written scenarios we wrote at the beginning.
That's why it is important to write a generic test that can be implemented both in an integration test and in an interface test.
So let's create that context that will be used for interface test (prefixed by Mink in our case, but you can prefix it by anything you want) under the directory features/context/registration.
File: features/context/registration/MinkRegisterContext:
<?php

namespace Acme\Tests\Behat\Context\Registration;

use Acme\AppBundle\Entity\User;
use Acme\AppBundle\Registration\Registerer;
use Behat\Behat\Context\Context;
use Behat\MinkExtension\Context\MinkContext;

/**
 * Mink register context.
 */
class MinkRegisterContext extends MinkContext
{
    /**
     * @Given I am on the registration page
     */
    public function iAmOnTheRegistrationPage()
    {
        $this->visit('/register');
    }

    /**
     * @Given /I register with username "(?P<username>[^"]*)" and password "(?P<password>[^"]*)"/
     */
    public function iRegisterWithUsernameAndPassword($username, $password)
    {
        $this->fillField('registration[username]', $username);
        $this->fillField('registration[password]', $password);
    }

    /**
     * @When I submit the form
     */
    public function iSubmitTheForm()
    {
        $this->pressButton('Register');
    }

    /**
     * @Then I should see the registration confirmation message
     */
    public function iShouldSeeTheRegistrationConfirmation()
    {
        $this->assertPageContainsText('Congratulations, you are now registered!');
    }
}
We just implemented an interface test based on the same scenario that the one we used for integration test so this class has exactly the same four methods with the same Behat annotations that we have implemented in our integration test class. The only difference here is that in this context we ask Mink to ask to Selenium to do actions on the interface of our application by executing a browser instead of testing the code itself.
One more thing now, we have to add previously created contexts in our suites section in the behat.yml configuration file.
suites:
        integration:
            paths:
                - %paths.base%/features/registration
            contexts:
                - Acme\Tests\Behat\Context\Registration\IntegrationRegisterContext:
                    - "@acme.registration.registerer"
        interface:
            paths:
                - %paths.base%/features/registration
            contexts:
                - Behat\MinkExtension\Context\MinkContext: []
                - Acme\Tests\Behat\Context\Registration\MinkRegisterContext: []
It is important to see here that we can clearly split these kind of tests into two distinct parts integration and interface: each one will be executed with its own contexts.
Also, as we have loaded the Symfony2 extension during the Behat set up, we have the possibility to inject Symfony services in our contexts and that case occurs here with the acme.registration.registerer service.
In order to run all tests, simply execute in the project root directory: bin/behat -c behat.yml.
If you want to run the integration tests only: bin/behat -c behat.yml --suite=integration.
HTML report will be generated under the web/reports/behat/ as specified in the configuration that will allow you to have a quick overview of failed tests which is cool when you have a lot of tests.
At last, sometime you could need information from another context. For instance, imagine that you have a second step just after the register step. You will have to create two new IntegrationProfileContext and MinkProfileContext contexts.
We will only talk about integration context in the following to simplify understanding.
In this new step IntegrationProfileContext, you need some information obtained in the first step IntegrationRegisterContext.
This can be achieved thanks to the @BeforeScenario Behat annotation.
File: features/context/registration/IntegrationProfileContext:
<?php

namespace Acme\Tests\Behat\Context\Registration;

use Behat\Behat\Context\Context;
use Behat\Behat\Hook\Scope\BeforeScenarioScope;

/**
 * Integration registration profile  context.
 */
class IntegrationProfileContext implements Context
{
    /**
     * IntegrationRegisterContext
     */
    protected $registerContext;

    /**
     * @BeforeScenario
     */
    public function gatherContexts(BeforeScenarioScope $scope)
    {
        $environment = $scope->getEnvironment();

        $this->registerContext = $environment->getContext(
            'Acme\Tests\Behat\Context\Registration\IntegrationRegisterContext'
        );
    }
}
You now have an accessible property $registerContext and can access informations from this context.
Everything starts from well-written tests which have to be thoughtful in order to allow a technical implementation on both integration tests and interface tests.
The choosen structure about classifying its tests is also important in order to quickly find tests when the application grows.
Author(s)
Vincent Composieux
Architecte passionné par les technologies web depuis de longues années, je pratique principalement du PHP (Symfony) / Javascript mais aussi du Python ou Golang.
You wanna know more about something in particular?
Let's plan a meeting!
Our experts answer all your questions.
Contact usDiscover other content about the same topic
You work with Symfony, but the concept of dependency injection is a little blurry for you? Find out how to take advantage of the component reading this article.

Are you suffering from domain anemia? Let's look at what an anemic domain model is and how things can change.
How to deploy PHP applications to AWS Lambda with Bref