
How to use ESLint to improve your workflow
ESLint ecosystem can be super handy for JS and TS codebases, but are you using it right? Keep reading to learn about useful ESLint rules and a get a little bit more out it.

In a previous article we created our first PWA, but we haven't seen the whole concept. The convenience of PWA is to act like a mobile application, to be installed on a phone, to manage off-line mode, and especially to send push notifications. Notifications are the essential element of user involvement, they allow to send a reminder and to communicate with our users. We are going to finalize the last tutorial by setting up a simple push notification system, using Firebase to store user tokens.
To go quicker, we invite you to catch up by retrieving the project https://github.com/CaptainJojo/pwa-parisjs that contains a ready to go PWA.
git clone https://github.com/CaptainJojo/pwa-parisjs
cd pwa-parisjs
git checkout manifest
npm install
npm start
At this point, you should have access to your PWA at localhost:8080. If you haven't done it yet, you have to install Lighthouse, this will allow you to make sure that you have a PWA. Before getting into sending push notifications, we are going to go through the configuration. Yes! It's not magic, we are going to ask Google for authorization. Let's go to Firebase to create a project.
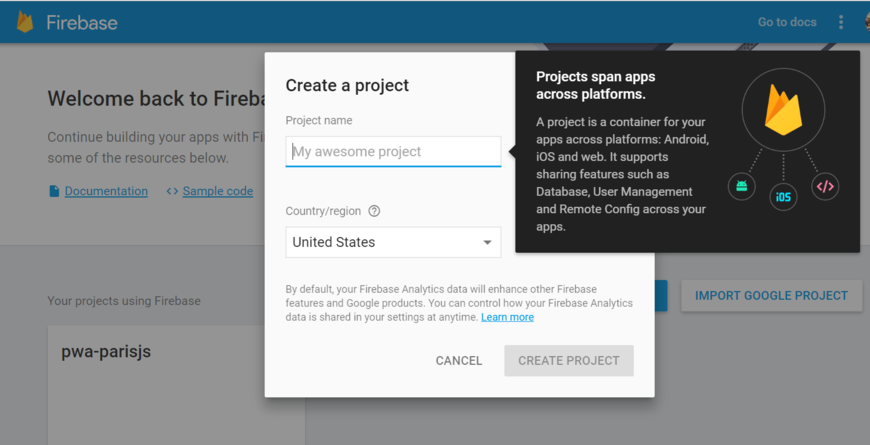
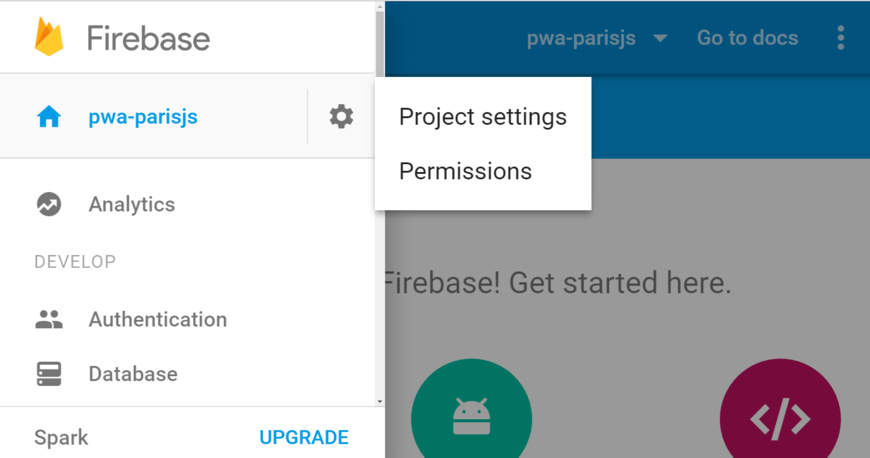
Feel free to choose any name for the project. Once you are on the dashboard, you have to click the small wheel, and then "Project settings".
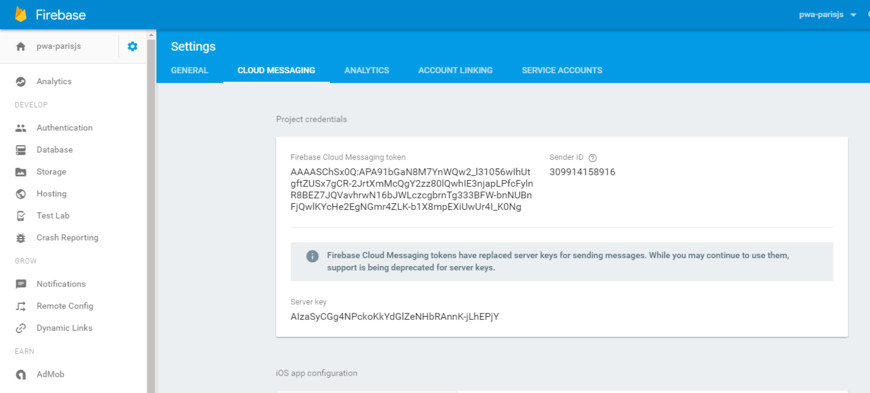
In the "Cloud messaging" tab you'll find your sender ID.
In the manifest.json, available in the public folder of the application, you have to add at the end of the file the "gsm_sender_id" with the value of the sender ID.
{
  "name": "Lemonde",
  "short_name": "Lemonde",
  "icons": [{
        "src": "images/touch/icon-128x128.png",
        "sizes": "128x128",
        "type": "image/png"
      }, {
        "src": "images/touch/apple-touch-icon.png",
        "sizes": "152x152",
        "type": "image/png"
      }, {
        "src": "images/touch/ms-touch-icon-144x144-precomposed.png",
        "sizes": "144x144",
        "type": "image/png"
      }, {
        "src": "images/touch/chrome-touch-icon-192x192.png",
        "sizes": "192x192",
        "type": "image/png"
      }],
  "start_url": "/",
  "display": "standalone",
  "background_color": "#3E4EB8",
  "theme_color": "#2F3BA2",
  "gcm_sender_id": "309914158916"
}
We are now going to ask the user to accept notifications. It's very easy, you only need to add the following code to the file public/register.js:
if('serviceWorker' in navigator) {
navigator.serviceWorker.register('/sw.js', { scope: '/' }).then(function() {
return navigator.serviceWorker.ready;
}).then(function(registration) {
registration.pushManager.subscribe({userVisibleOnly: true}).then(function(sub) {
var endpointSections = sub.endpoint.split('/');
var subscriptionId = endpointSections[endpointSections.length - 1];
console.log('endpoint:', subscriptionId);
});
});
navigator.serviceWorker.ready.then(function(registration) {
console.log('Service Worker Ready');
});
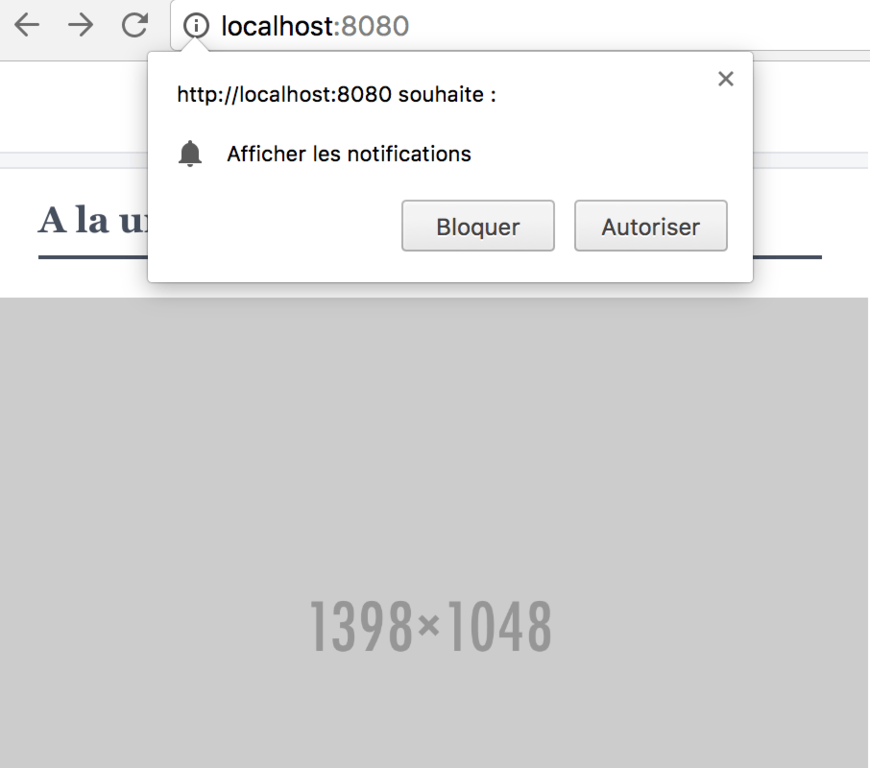
}As you would expect, if you restart your server, you'll have a request to accept the notifications.
You should also see in your console a message such as:
endpoint: cV2kP3sOb24:APA91bHfZgFSPQ3CXyG9LejWdq9jOT-WqQpvK4peX9ZZtrfsHCf6OPEvDegjsTF3uXj-Qsf4jOJ5O8rwdEm9fjKZbqerzcZUjDmsiaRcqmxuOOkpuEqPca31Dlh-6g0YgkvnLccIPz_Z
This is the device token, we will use it to send a push notification. Since we want to do something clean (even if it's just a tutorial), we are going to use Firebase to store user tokens. To do so, let's go back to the Firebase console, and click "Web setup" in the "Authentication" tab.
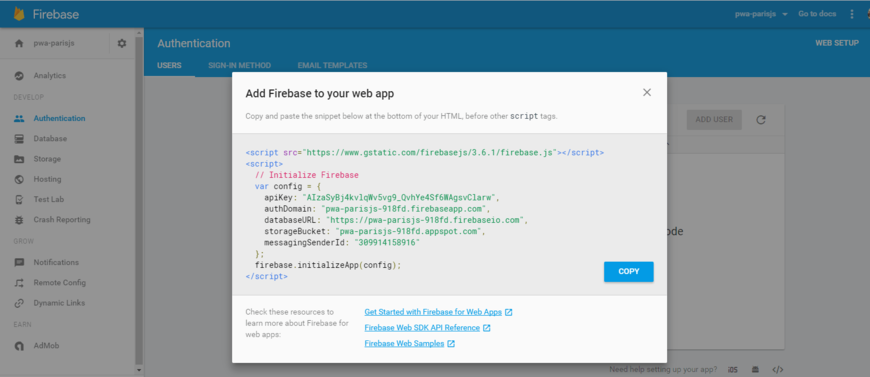
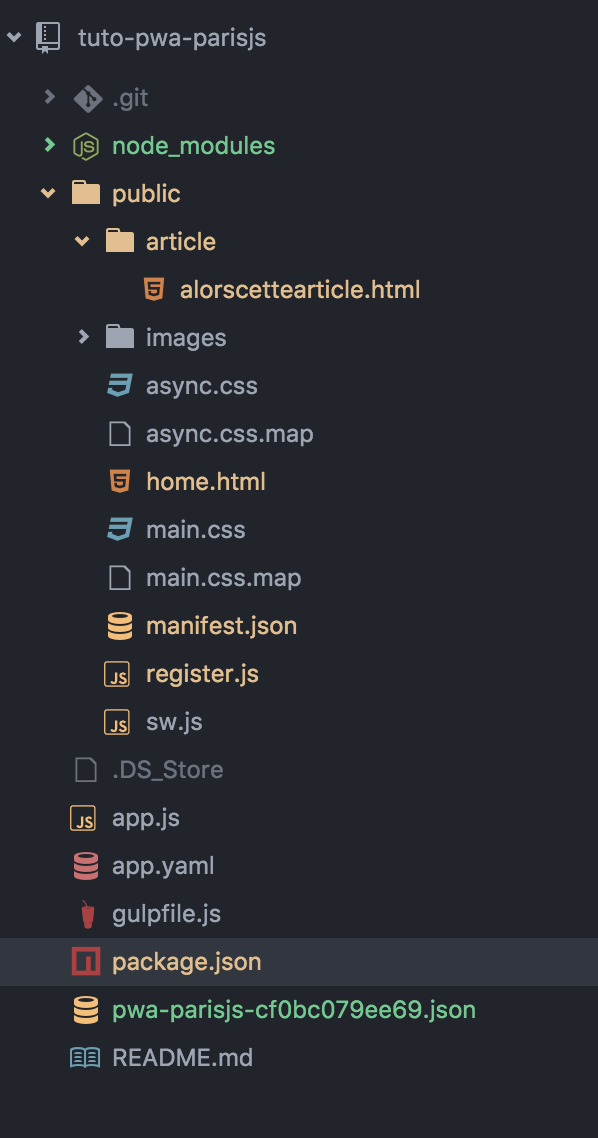
The script installation is done in the HTML code, in files public/home.html and public/article/alorscettearticle.html.
<html>
  <head>
    <meta charset=utf-8/>
    <meta name="theme-color" content="#2F3BA2">
    <meta name="viewport" content="width=device-width, initial-scale=1">
    <link rel="manifest" href="/public/manifest.json">
  </head>
  <body>
    <script src="https://www.gstatic.com/firebasejs/3.5.2/firebase.js"></script>
    <script src="/register.js"></script>
    <link rel="stylesheet" href="/main.css">
    <link rel="stylesheet" href="/async.css">
The initialization goes to public/register.js.
// Initialize Firebase
var config = {
  apiKey: "AIzaSyCGg4NPckoKkYdGlZeNHbRAnnK-jLhEPjY",
  authDomain: "pwa-parisjs.firebaseapp.com",
  databaseURL: "https://pwa-parisjs.firebaseio.com",
  storageBucket: "pwa-parisjs.appspot.com",
  messagingSenderId: "309914158916"
};

firebase.initializeApp(config);

if('serviceWorker' in navigator) {
  navigator.serviceWorker.register('/sw.js', { scope: '/' }).then(function() {
      return navigator.serviceWorker.ready;
    }).then(function(registration) {
      registration.pushManager.subscribe({userVisibleOnly: true}).then(function(sub) {
        var endpointSections = sub.endpoint.split('/');
        var subscriptionId = endpointSections[endpointSections.length - 1];
        console.log('endpoint:', subscriptionId);
      });
    });
  navigator.serviceWorker.ready.then(function(registration) {
     console.log('Service Worker Ready');
  });
}
Now that Firebase is installed, we have to store the user token in the "database". You will find all the help you need in the Firebase documentation. So, we are going to add the file public/register.js
// Initialize Firebase
var config = {
apiKey: "AIzaSyCGg4NPckoKkYdGlZeNHbRAnnK-jLhEPjY",
authDomain: "pwa-parisjs.firebaseapp.com",
databaseURL: "https://pwa-parisjs.firebaseio.com",
storageBucket: "pwa-parisjs.appspot.com",
messagingSenderId: "309914158916"
};
firebase.initializeApp(config);
if('serviceWorker' in navigator) {
navigator.serviceWorker.register('/sw.js', { scope: '/' }).then(function() {
return navigator.serviceWorker.ready;
}).then(function(registration) {
registration.pushManager.subscribe({userVisibleOnly: true}).then(function(sub) {
var endpointSections = sub.endpoint.split('/');
var subscriptionId = endpointSections[endpointSections.length - 1];
var newKey = firebase.database().ref().child('token').push().key;
firebase.database().ref('token/' + newKey).set({subscriptionId: subscriptionId});
console.log('endpoint:', subscriptionId);
});
});
navigator.serviceWorker.ready.then(function(registration) {
console.log('Service Worker Ready');
});
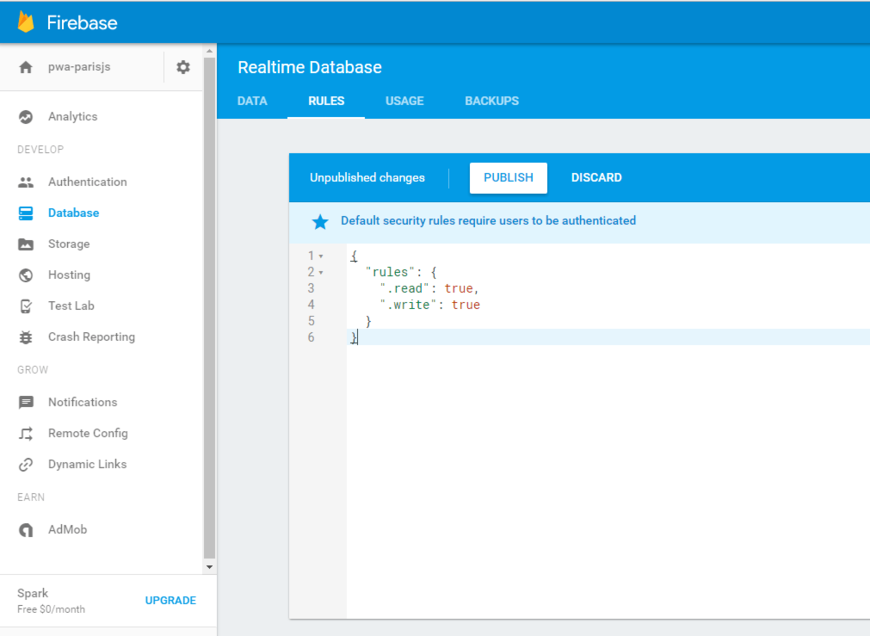
}Before starting the server, you have to open permissions to Firebase in order for it to be able to write into the database. In the tab "Database" -> "Rules" you need to put:
{
  "rules": {
    ".read": true,
    ".write": true
  }
}
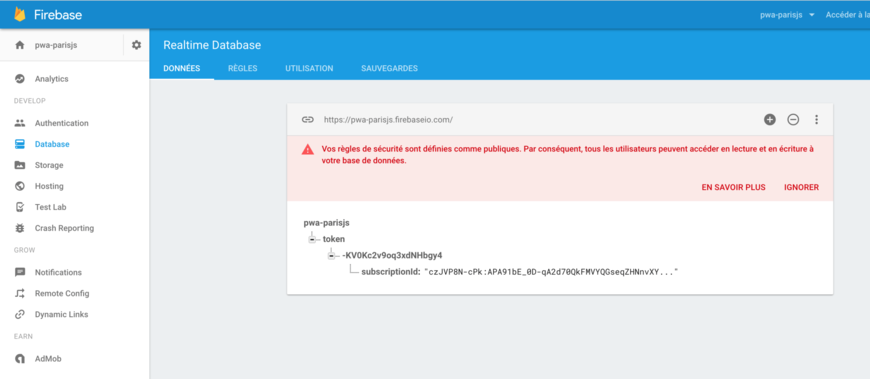
If you restart the server, you will see a token stored in the DB in the "Database" tab of Firebase.
Now that the tokens are stored in the database, we are going to prepare a message that will appear when a push notification occurs. Let's add the following code to the file public/sw.js:
console.log('Started', self);

self.addEventListener('install', function(event) {
  self.skipWaiting();
  console.log('Installed', event);
});

self.addEventListener('activate', function(event) {
  console.log('Activated', event);
});

self.addEventListener('push', function(event) {
  console.log('Push message', event);

  var title = 'Le push de test :)';

  event.waitUntil(
    self.registration.showNotification(title, {
     body: 'Bravo tu las reçu',
     icon: 'images/icon.png',
     tag: 'my-tag'
   }));
});
It's almost ready! We are going to create a "/sender" url that will allow us to send notifications to all the tokens that we have in the database. To do so, we are going to use the request and firebase modules (npm version). Here is the new package.json:
{
  "name": "pwa-parisjs",
  "version": "0.0.1",
  "description": "A Progressive Web App",
  "main": "app.js",
  "scripts": {
    "start": "node app.js",
    "sw": "gulp sw-precache"
  },
  "dependencies": {
    "express": "^4.14.0",
    "firebase": "^3.5.1",
    "request": "^2.75.0"
  },
  "devDependencies": {
    "gulp": "^3.9.1",
    "sw-precache": "^3.2.0"
  }
}
In the app.js file, we initialize Firebase. You are going to need a server key file. Click the wheel in Firebase, and then "Permissions". You are now taken to another console.

In "Service accounts", create a new account.
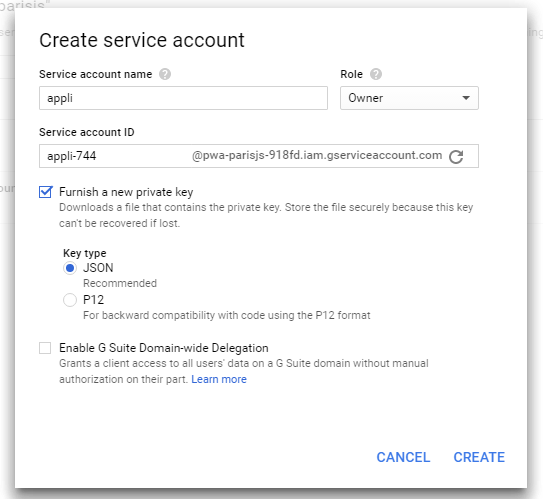
A json file will be downloaded, you need to add it to your project folder.
In the app.js file, we are going to add the route /sender that will send a request of a push notification with all the tokens.
var path = require('path');
var express = require('express');
var app = express();
var firebase = require('firebase');
var request = require('request');

firebase.initializeApp({
  databaseURL: 'https://pwa-parisjs.firebaseio.com/', // To be found in the Database tab
  serviceAccount: 'pwa-parisjs-cf0bc079ee69.json' // Name of the json file at the root of your app folder
});

app.use(express.static(path.join(__dirname, 'public'), {index: false}))

app.get('/sender', function(req, res){
  var allToken = firebase.database().ref('/token');
  Promise.all([allToken.once('value')]).then(function(resp) {
    var allToken = resp[0].val();
    tokenRep = '';
    Object.keys(allToken).forEach(function(uid) {
      var token = allToken[uid];
      request({
        url: 'https://android.googleapis.com/gcm/send',
        method: 'POST',
        headers: {
          'Content-Type' :' application/json',
          'Authorization': 'key=AIzaSyDV-KhCa9dM-bSg_r23GUwpRJqBw6qrJIc', // Server key available in the parameters of the Firebase project
        },
        body: JSON.stringify(
          {
            "registration_ids" : [token.subscriptionId]
          }
        )
      }, function(error, response, body) {

      });
    });
  }).catch(function(error) {
    console.log('Failed to start weekly top posts emailer:', error);
  });

  res.send('ok');
});


app.use('/', function (req, res) {
  res.sendFile(__dirname + '/public/home.html');
});

app.listen(8080, function () {
  console.log('Example app listening on port 8080!');
});
Be careful! The authorization key is in the first tab that we opened.
If everything is ok, when you restart the server and go to / and then /sender, you will get a notification. If it isn't the case, clear the cache of your application in the chrome console.

Once again, this code is only a tutorial, I invite you to open issues for any question. The finale code is available here.
Article translated from the french by Marie Gautier
Author(s)
Jonathan Jalouzot
Lead développeur au @lemondefr, mes technologies sont le symfony depuis 2009, le nodejs, l'angularjs, rabbitMq etc ... J'adore les médias et aimerai continuer dans ce secteur plein de surprise. Vous pouvez me retrouver sur les réseaux sociaux: Twitter: @captainjojo42 Instagram: @captainjojo42 Linkedin: https://fr.linkedin.com/in/jonathanjalouzot Github: https://github.com/captainjojo
You wanna know more about something in particular?
Let's plan a meeting!
Our experts answer all your questions.
Contact usDiscover other content about the same topic
ESLint ecosystem can be super handy for JS and TS codebases, but are you using it right? Keep reading to learn about useful ESLint rules and a get a little bit more out it.

Tutorial on the basics of NextJS for building a website.
You may not be using the React states optimally and I'll explain why