Introduction
Consul is a product developed in Go language by the HashiCorp company and was born in 2013.
Consul has multiple components but its main goal is to manage the services knowledge in an architecture (which is service discovery) and also allows to ensure that all contacted services are always available by adding health checks on them.
Basically, Consul will bring us a DNS server that will resolve IP addresses of a host's services, depending on which one will be healthy.
This method also allows to do load balancing even if we will see in this blog post that it's actually not possible to distribute priorities between services.
Another Consul service we'll use in this article is key/value storage because we'll create a Docker Swarm cluster and will use Consul as the discovery/storage for Docker Swarm.
In order to clarify the rest of the article, here are the ports used by Consul:
8300 (+ 8301 et 8302): RPC exchanges,8400: RPC exchanges by the CLI,8500: Used for HTTP API and web interface,8600: Used for DNS server.
Next, we'll focus on service discovery and failure detection. To do that, we'll create a Docker Swarm cluster with the following architecture:
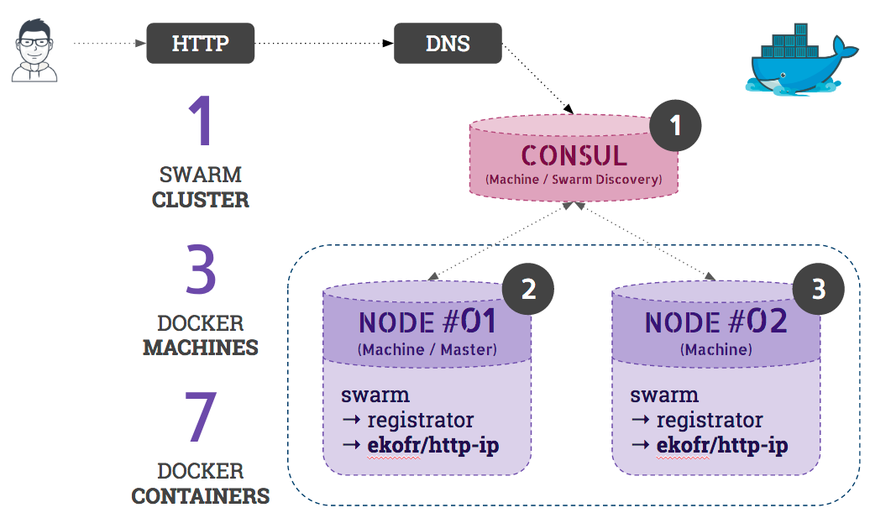
As you can see, we'll have 3 Docker machines:
- A
Consul machine (used for Swarm Discovery),
- A machine that will act as our "
node 01" with an HTTP service that will run on it (Swarm),
- A machine that will act as our "
node 02" with an HTTP service that will run on it (Swarm).
We'll also add on our two nodes a Docker container with Registrator image that will facilitate the discovery of Docker containers into Consul.
For more information about Registrator, you can visit: https://gliderlabs.com/registrator/.
Let's start to install our architecture!
Service discovery
First machine: Consul (Swarm Discovery)
We'll start by creating our first machine: Consul
To do that, just type:
$ docker-machine create -d virtualbox consul
Once the machine is fully ready, prepare your environment to use this Docker machine and launch a Consul container:
$ eval $(docker-machine env consul)
$ docker run -d \
    -p 8301:8301 \
    -p 8302:8302 \
    -p 8400:8400 \
    -p 8500:8500 \
    -p 53:8600/udp \
    consul
Well, your Consul is ready to receive your services and also our Docker Swarm nodes!
By the way, you can open the web interface by obtaining the Consul machine IP address:
$ docker-machine ip consul
<obtained-ip>
Then, open in your browser the following URL: http://<obtained-ip>:8500.
Second machine: Node 01
Now, it's time to create the machine that corresponds to our first Docker Swarm cluster node and that will also receive the master role for our cluster (we need one...):
$ docker-machine create -d virtualbox \
    --swarm \
    --swarm-master \
    --swarm-discovery="consul://$(docker-machine ip consul):8500" \
    --engine-opt="cluster-store=consul://$(docker-machine ip consul):8500" \
    --engine-opt="cluster-advertise=eth1:2376" swarm-node-01
As you can see, we've added the --swarm-discovery option with our Consul machine IP address and port 8500 that corresponds to the Consul API. This way, Docker Swarm will use the Consul API to store machine information with the rest of the cluster.
We'll now configure our environment to use this machine and install a Registrator container on top of it in order to auto-register our new services (Docker containers).
To do that, type the following:
$ eval $(docker-machine env swarm-node-01)
Then:
$ docker run -d \
    --volume=/var/run/docker.sock:/tmp/docker.sock \
    gliderlabs/registrator \
    -ip $(docker-machine ip swarm-node-01) \
    consul://$(docker-machine ip consul):8500
Here, you can notice that we share the host Docker socket in the container. This solution could be a controversial solution but in our example case, forgive me about that ;)
If you want to register services to Consul I recommend to register them using the Consul API in order to keep control on what's added in your Consul.
The -ip option allows to precise to Registrator that we want to register our services with the given IP address: so here the Docker machine IP address and not the Docker container internal IP address.
We are now ready to start our HTTP service. This one is located under the "ekofr/http-ip" Docker image which is a simple Go HTTP application that renders "hello, " with the IP address of the current container.
In order to fit this article needs, we will also create a different network for the two Docker machines in order to clearly identify IP addresses for our two services.
Let's create a new network concerning our first node:
$ docker network create \
     --subnet=172.18.0.0/16 network-node-01
then you can use the newly created network to be used with your HTTP service container:
$ docker run -d \
    --net network-node-01 \
    -p 80:8080 \
    ekofr/http-ip
Before executing the same steps for our second node, we will ensure that our HTTP service works:
$ curl http://localhost:80
hello from 172.18.0.X
Third machine: Node 02
We'll now repeat most steps we've ran for our first node but we'll change some values. First, create the Docker machine:
$ docker-machine create -d virtualbox \
    --swarm \
    --swarm-discovery="consul://$(docker-machine ip consul):8500" \
    --engine-opt="cluster-store=consul://$(docker-machine ip consul):8500" \
    --engine-opt="cluster-advertise=eth1:2376" swarm-node-02
Prepare your environment to use this new node 02 machine and install Registrator container on it:
$ eval $(docker-machine env swarm-node-02)
$ docker run -d \
    --volume=/var/run/docker.sock:/tmp/docker.sock \
    gliderlabs/registrator \
    -ip $(docker-machine ip swarm-node-02) \
    consul://$(docker-machine ip consul):8500
Now, create the new network and launch your HTTP service:
$ docker network create \
    --subnet=172.19.0.0/16 network-node-02
$ docker run -d \
    --net network-node-02 \
    -p 80:8080 \
    ekofr/http-ip
We are all set! We can now discover what Consul brings to us.
DNS Request
Indeed, you can now resolve your service hostname http-ip.service.consul by using the DNS server brought by Consul and you should see your two services appearing as a DNS record:
$ dig @$(docker-machine ip consul) http-ip.service.consul

;; QUESTION SECTION:
;http-ip.service.consul. IN A

;; ANSWER SECTION:
http-ip.service.consul. 0 IN A 192.168.99.100
http-ip.service.consul. 0 IN A 192.168.99.102
In other words, a kind of load balancing will be done on one of these services when you'll try to join them http://http-ip.service.consul.
Ok, but what about the load balancing repartition? Are we able to define a priority and/or weight for each services?
Sadly, the answer is no, actually. An issue is currently opened about that on Github in order to bring this support. You can find it here: https://github.com/hashicorp/consul/issues/1088.
Indeed, if we look in details about SRV DNS record type, here is what we get:
$ dig @$(docker-machine ip consul) http-ip.service.consul SRV

;; ANSWER SECTION:
http-ip.service.consul. 0 IN SRV 1 1 80 c0a86366.addr.dc1.consul.
http-ip.service.consul. 0 IN SRV 1 1 80 c0a86364.addr.dc1.consul.
As you can see here, priority and weight are both defined to value 1 so the load balancing will be equal between all services.
If you add the Consul Docker machine IP address as a DNS server on your operating system, you'll be able to perform HTTP calls and see more easily what's happening on load balancing:
$ curl http://http-ip.service.consul
hello from 172.18.0.2

$ curl http://http-ip.service.consul
hello from 172.19.0.2
Here, we have an IP address that corresponds to each HTTP service that we have registered so we can clearly see that we are load balanced between our two containers.
Failure detection
We'll now add a Health Check to our service in order to ensure that it can be use safely by our users.
In this case we'll start to return on our node 01 and suppress the container named ekofr/http-ip in order to recreate it with a Health Check:
$ eval $(docker-machine env swarm-node-01)
$ docker kill \
    $(docker ps -q --filter='ancestor=ekofr/http-ip')
Registrator brings us some environment variables in order to add some Health Check for our containers into Consul and you can see the full list here: http://gliderlabs.com/registrator/latest/user/backends/#consul.
Idea here is to verify that port 80 is opened and application answers correctly so we'll add a script that simply executes a curl command:
$ docker run -d \
    --net network-node-01 -p 80:8080 \
    -e SERVICE_CHECK_SCRIPT="curl -s -f http://$(docker-machine ip swarm-node-01)" \
    -e SERVICE_CHECK_INTERVAL=5s \
    -e SERVICE_CHECK_TIMEOUT=1s \
    ekofr/http-ip
You can do the same thing on your node 02 (by paying attention to modify the node-01 values to node-02 ) and you should now visualize these checks on the Consul web UI:
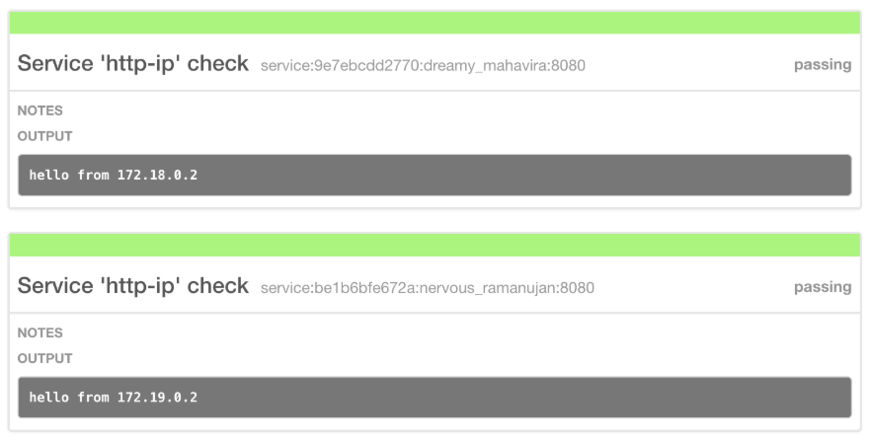
You can also use the Consul API in order to verify the good health of your services:
$ curl http://$(docker-machine ip consul):8500/v1/health/checks/http-ip
[
  {
    "Status": "passing",
    "Output": "hello from 172.18.0.2",
    "ServiceName": "http-ip",
  },
  ...
]
Conclusion
You are now able to install Consul on your projects architectures in order to ensure that services you contact are available and also be able to identify eventual issues that can occur on your services.
It's important to add a maximum of checks on elements that can make your services become unavailable (ensure that this one can be contacted and answer, ensure that remaining available disk space is sufficient, etc...).
Consul is a tool that integrates well in your architectures by its simplicity of use and its powerful API.

