
Migrating from a Monolith to Microservices: A Step-by-Step Guide
This article is a step-by-step guide on how to migrate from a Monolith to Microservices

Today if you want to set up a CI/CD on GitHub you need to “link” your repositories with Travis-ci, Circle-ci, Codeship... But did you know that GitLab integrates a CI/CD solution? This is the subject of today's article.
In this article I will just show you the possibilities that GitLab CI/CD offers to you. But if you want to dig further in the subject, I've also created a tutorial on Eleven Labs codelabs on how to set up a CI on a javascript project
I'm not going to write yet another definition for you, beecause there exist plenty already. So here is what Wikipedia tells us for CI and CD:
“Continuous integration is a set of practices used in software engineering consisting in verifying with each modification of source code that the result of the modifications does not produce a regression in the developed application. [...] The main goal of this practice is to detect integration problems as early as possible during development. In addition, it allows you to automate the execution of test suites and see the evolution of software development.”
"Continuous delivery is a software engineering approach in which teams produce software in short cycles, allowing it to be made available anytime. The goal is to build, test, and distribute software faster. The approach helps reduce the cost, time and risk associated with delivering change by taking a more incremental approach to changes in production. A simple, repeatable deployment process is key."
So Gitlab is :
GitLab and GitLab.com are web-based git repository managers with features like:
GitLab offers more features than GitHub in its free version. It is also possible to have private repositories without having a subscription.
GitLab CI/CD will allow you to automate the builds, the tests, the deployments, etc of your applications. All of your tasks can be broken down into stages and all of your tasks and stages make up a pipeline.
Each task is executed thanks to runners, which work thanks to an open source project named GitLab Runner written in GO.
You can have your own runners directly on your machine or server. For more information I let you read the official documentation:
GitLab also offers public runners, which save you an installation, but beware, there are quotas depending on the type of account you have. On a free account, you are entitled to 2,000 minutes of pipeline time per month. The gitlab.com public runners run on AWS.
As I told you I will not show you how to set up a CI/CD from A to Z in this article but I will introduce you to the possibilities of the GitLab CI/CD solution.
For the CI/CD on GitLab to work you need a .gitlab-ci.yml manifest at the root of your project. In this manifesto you will be able to define stages, jobs, variables, anchors, etc.
You can give it another name, but you will have to change the manifest name in the web interface settings: Settings > CI/CD > General pipelines > Custom CI config path
In the GitLab CI/CD manifesto you can define an unlimited number of jobs, with constraints indicating when they should be executed or not.
Here is the easiest way to declare a job:
job:
  script: echo 'my first job'
If you want to declare several jobs :
job:1:
  script: echo 'my first job'

job:2:
  script: echo 'my second job'
Names of jobs must be unique and should not be part of reserved words:
imageservicesstagestypesbefore_scriptafter_scriptvariablescacheIn the definition of a job only script is mandatory.
The script declaration is the only mandatory part of a job. This declaration is the heart of the job because it is here that you will indicate the actions to be performed.
It can call one or more script(s) in your project, or even execute one or more command line(s).
job:script:
  script: ./bin/script/my-script.sh ## Appel d'un script de votre projet

job:scripts:
  script: ## Calls two scripts from your project
    - ./bin/script/my-script-1.sh
    - ./bin/script/my-script-2.sh

job:command:
  script: printenv # Execution of a command

job:commands:
  script: # Execution of two commands
    - printenv
    - echo $USER
These declarations will allow you to perform actions before and after your main script. This can be interesting to divide the actions to be done during the jobs, or to call or execute an action before and after each job.
before_script: # Execution of a command before each `job`
  - echo 'start jobs'

after_script: # Execution of a command after each `job`
  - echo 'end jobs'

job:no_overwrite: # Here the job will execute the actions of the `before_script` and `after_script` by default
  script:
    - echo 'script'

job:overwrite:before_script:
  before_script:
    - echo 'overwrite' # Will not perform the action defined in the `before_script` by default
  script:
    - echo 'script'

job:overwrite:after_script:
  script:
    - echo 'script'
  after_script:
    - echo 'overwrite' # Will not perform the action defined in the `after_script` by default

job:overwrite:all:
  before_script:
    - echo 'overwrite' # Will not perform the action defined in the `before_script` by default
  script:
    - echo 'script'
  after_script:
    - echo 'overwrite' # Will not perform the action defined in the `after_script` by default
This declaration is simply the docker image that will be used during a job or during all jobs.
image: alpine # Image used by all `jobs`, this will be the default image

job:node: # Job using image node
  image: node
  script: yarn install

job:alpine: # Job using default image
  script: echo $USER
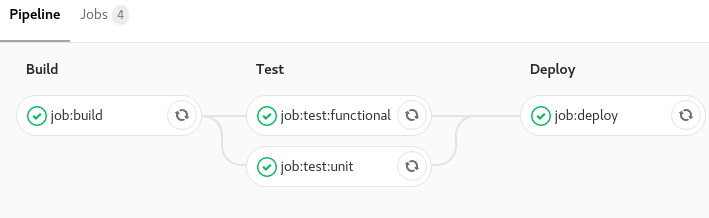
This declaration makes it possible to group jobs into stages. For example, we can do a build, codestyling, test, code coverage, deployment step,….
stages: # Here we declare all our steps
  - build
  - test
  - deploy

job:build:
  stage: build # We declare that this `job` is part of the build step
  script: make build

job:test:unit:
  stage: test # We declare that this `job` is part of the test step
  script: make test-unit

job:test:functional:
  stage: test # We declare that this `job` is part of the test step
  script: make test-functional

job:deploy:
  stage: deploy # We declare that this `job` is part of the deploy step
  script: make deploy
These two directives allow you to put in place constraints on the execution of a task. You can say that a task will run only on the event of a push on master or run on every push in a branch except master.
Here are the possibilities:
job when a push is made on the specified branches.job when a tag is created.job when a second pipeline requests it through pipeline API.job through a CI/CD service other than GitLab.job thanks to another pipeline, useful for multiprojects thanks to the API and the CI_JOB_TOKEN token.job when push is done by a user.job in accordance to a schedule to be configured in the web interface.job in accordance to a trigger token.job in accordance to Run pipeline button in the web interface.I'll show you three examples of use:
In its simplest use, only and except are declared like this:
job:only:master:
  script: make deploy
  only:
    - master # The job will only be performed during an event on the master branch

job:except:master:
  script: make test
  except:master:
    - master # The job will be performed on all branches during an event except on the master branch
In its most complex use, only and except are used like this:
job:only:master:
  script: make deploy
  only:
    refs:
      - master # Will only be done on master
    kubernetes: active # Kubernetes will be available
    variables:
      - $RELEASE == "staging" # Check that $RELEASE is "staging"
      - $STAGING # Check that $STAGING is defined
For the use of schedules you must first define rules in the web interface.
You can configure them in the Gitlab web interface: CI/CD -> Schedules and fill out the form.
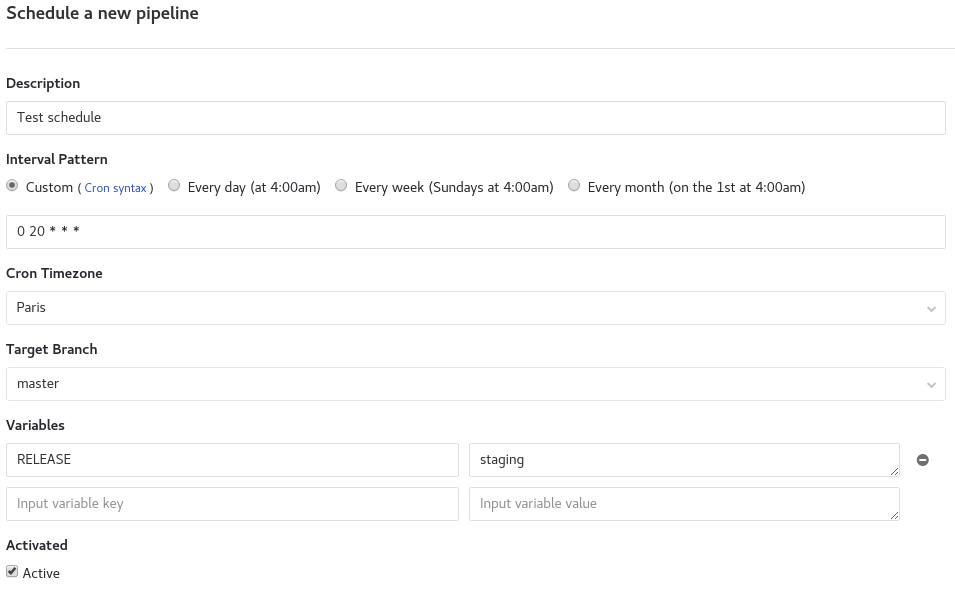
If you want, you can set a custom time interval. This is what I did in my example. The definition is made as a cron.
As with the only and except directives, the when directive is a constraint on the execution of the task. There are four possible modes:
on_success: the job will be executed only if all the jobs of the previous stage have passedon_failure: the job will be executed only if a job failsalways: the job will be executed no matter what (even in case of failure)manual: the job will be executed only by a manual actionstages: - build - test - report - clean job:build: stage: build script: - make build job:test: stage: test script: - make test when: on_success # will only run if the `job:build` job passes job:report: stage: report script: - make report when: on_failure # will run if the job `job:build` or` job:test` does not pass job:clean: stage: clean script: - make clean # will run in all cases when: always
This directive is used to accept that a job fails without causing the pipeline to fail.
stages:
  - build
  - test
  - report
  - clean

...

stage: clean
  script:
    - make clean
    when: always
    allow_failure: true # Will not fail the pipeline
...
As I told you at the beginning of the article, with GitLab Runner you can host your own runners on a server which can be useful for specific configuration.
Each runner that you define on your server has a name, if you put the name of the runner in tags, then this runner will be executed.
job:tag:
  script: yarn install
  tags:
    - shell # The runner with the name `shell` will be launched
This declaration allows you to add basic services (docker container) to help you with your jobs.
For example if you want to use a database to test your application you will ask for it in services.
test:functional:
  image: registry.gitlab.com/username/project/php:test
  services:
    - postgres # We call the `postgres` service as a database
 before_script:
   - composer install -n
 script:
   - codecept run functional
This declaration is used to define a specific environment for the deployment. You can create an environment in the GitLab web interface or just let GitLab CI/CD create it automatically.
It is possible to specify:
name,url,on_stop condition,action in response to the previous condition.... deploy:demo: stage: deploy environment: demo # Simple environmental statement script: - make deploy deploy:production: environment: # Extended environmental statement name: production url: 'https://blog.eleven-labs/fr/gitlab-ci/' # Application URL script: - make deploy
By declaring environments you can, from the GitLab web interface, deploy / redeploy your application or directly access your site if you have declared a url. This is done in Operations > Environment.

The undo button allows you to redeploy, the external link button allows you to go to the application and the remove button allows you to remove the environment.
on_stop and action will be used to add an action at the end of the deployment, if you want to stop your application on command. Useful for demonstration environments.
...

deploy:demo:
  script: make deploy
  environment:
    name: demo
    on_stop: stop:demo

stop:demo: # This job can only be visible and executed after the `deploy:demo` job
  script: make stop
  environment:
    name: demo
    action: stop
Here is the official link for the environments documentation if you want to go further.
This declaration allows you to define variables for all jobs or for a specific job.
This is equivalent to declaring environment variables.
...
variables: # Declaration of variables for all `jobs`
  SYMFONY_ENV: prod

build:
  script: echo ${SYMFONY_ENV} # Will display "prod"

test:
  variables: # Declaration and rewrite of global variables for this `job`
    SYMFONY_ENV: dev
    DB_URL: '127.0.0.1'
  script: echo ${SYMFONY_ENV} ${DB_URL} # Will display "dev 127.0.0.1"
As with environment I'll let you look at the official documentation on variables if you want to go further.
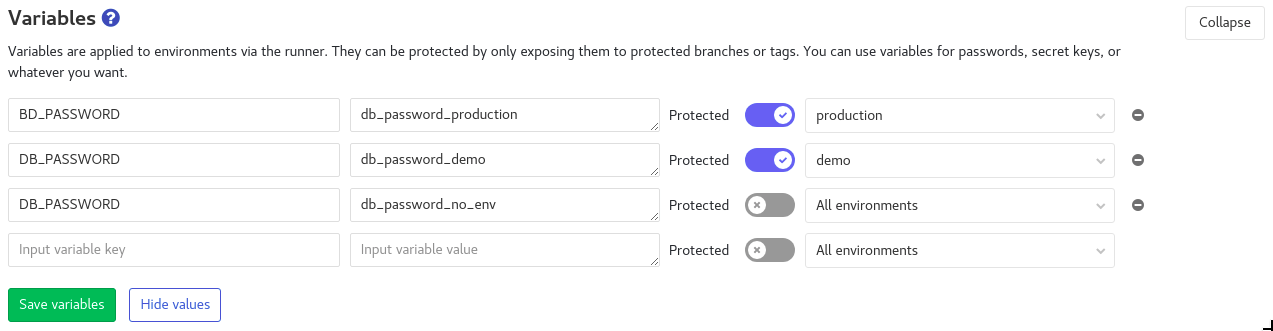
It is also possible to declare variables from the GitLab web interface Settings> CI/CD> Variables and to specify an environment for them.
This directive allows you to play with cache. The cache is useful for specifying a list of files and directories to cache along your pipeline. Once the pipeline is finished the cache will be destroyed.
Several sub-directives are possible:
push during your pipeline.push or pull).stages: - build - deploy job:build: stage: build image: node:8-alpine script: yarn install && yarn build cache: paths: - build # cached directory policy: push # the cache will just be backed up, no recovery of an existing cache job:deploy: stage: deploy script: make deploy cache: paths: - build policy: pull # cache recovery
Artifacts are a bit like cache, but they can be retrieved from another pipeline.
As for the cache, you must define a list of files or / and directories that will be saved by GitLab.
Files are saved only if the job is successful.
We find five possible sub-directives:
artifactartifact. By default it will be named artifacts.zip.gitignore fileartifact must be created. Three possible choices: on_success, on_failure, and always. The on_success value is the default.job: script: make build artifacts: paths: - dist name: artifact:build when: on_success expire_in: 1 weeks
This declaration works with artifacts, it makes a job dependent on an artifact. If the 'artifact' has expired or has been deleted / does not exist, then the pipeline will fail.
build:artifact:
  stage: build
  script: echo hello > artifact.txt
  artifacts: # Add an `artifact`
    paths:
      - artifact.txt

deploy:ko:
  stage: deploy
  script: cat artifact.txt
  dependencies: # We link the job with 'build:artifact:fail' which does not exist so the pipeline will fail
    - build:artifact:fail

deploy:ok:
  stage: deploy
  script: cat artifact.txt
  dependencies: # We link the job with 'build:artifact' which exists so the pipeline will not fail
    - build:artifact
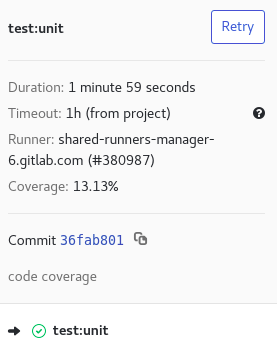
This declaration allows you to specify a regular expression to retrieve the code coverage for a job.
...

test:unit:
  script: echo 'Code coverage 13.13'
  coverage: '/Code coverage \d+\.\d+/'
The code coverage will be visible in the job information in the GitLab web interface:
This declaration allows to re-execute the job in case of failure. You must indicate the number of times you want to re-run the job.
job:retry:
  script: echo 'retry'
  retry: 5
For this functionality you will need a premium account. This functionality allows you to include "templates". The "templates" can be local in your project or remotely.
Files are always evaluated first and merged recursively. You can override or replace "template" declarations.
# template-ci/.lint-template.yml

job:lint:
  stage: lint
  script:
    - yarn lint
# https://gitlab.com/awesome-project/raw/master/template-ci/.test-template.yml

job:test:
  stage: test
  script:
    - yarn test
# .gitlab-ci.yml

include:
  - '/template-ci/.lint-template.yml'
  - 'https://gitlab.com/awesome-project/raw/master/template-ci/.test-template.yml'

stages:
  - lint
  - test

image: node:9-alpine

job:lint:
  before_script:
    - yarn install

job:test:
  script:
    - yarn install
    - yarn unit
Here is what gitlab CI/CD will interpret:
stages:
  - lint
  - test

image: node:9-alpine

job:lint:
  stage: lint
  before_script: # we override `job:lint` with `before_script`
    - yarn install
  script:
    - yarn lint

job:test:
  stage: test
  script: # we replace the `script` declaration of the "template" https://gitlab.com/awesome-project/raw/master/template-ci/.test-template.yml
    - yarn install
    - yarn unit
This can be useful if your manifesto is large, and therefore more difficult to maintain.
This feature allows you to reuse templates several times.
.test_template: &test_template
  stage: test
  image: registry.gitlab.com/username/project/php:test
  before_script:
    - composer install -n
  when: on_success

.db_template:
  services:
    - postgres
    - mongo

test:unit:
  <<: *test_template
  script:
    - bin/phpunit --coverage-text --colors=never tests/

test:functional:
  <<: *test_template
  services: *db_template
  script:
    - codecept run functional
Here is what gitlab CI/CD will interpret:
test:unit:
  stage: test
  image: registry.gitlab.com/username/project/php:test
  before_script:
    - composer install -n
  script:
    - bin/phpunit --coverage-text --colors=never tests/
  when: on_success

test:functional:
  stage: test
  image: registry.gitlab.com/username/project/php:test
  services:
    - postgres
    - mongo
  before_script:
    - composer install -n
  script:
    - codecept run functional
  when: on_success
Author(s)
Nicolas Grévin
Ingénieur DevOps SRE spécialisé en conteneurisation, Kubernetes, CI/CD, cloud, Infrastructure as Code et outillage. Engagé dans la Green IT et développeur passionné.
Marie Minasyan
Astronaute Raccoon @ ElevenLabs_🚀 De retour dans la Galaxie.
You wanna know more about something in particular?
Let's plan a meeting!
Our experts answer all your questions.
Contact usDiscover other content about the same topic
This article is a step-by-step guide on how to migrate from a Monolith to Microservices

You work with Symfony, but the concept of dependency injection is a little blurry for you? Find out how to take advantage of the component reading this article.

CQRS, which means _Command_ _Query Responsibility Segregation_, comes from CQS (_Command Query Separation_) introduced by Bertrand Meyer in _Object Oriented Software Construction_. Meyer states that every method should be either a _query_ or a _command_.